Sunday, 4 November 2012

Finally, a series of up-dates to show what has happened over the past year.


My apologies to all those who have waited from last year to see what progress has been made on the renovation project. The lack of posts doesn't mean that it has stopped, rather the reverse and we are now close to actually completing it. Over this past year I have been so busy, often putting in 12 hour days at the building work, that I simply haven't had either the time, or the energy, to sit at the computer and compose postings for the blog.

So now the pressure is off, and I can spend a little time showing you what has been achieved. I shall deal with each of the areas separately and try to give you a flavour of work done to create the finished product.

For this first of the linked postings you will see the huge improvement made by putting a coating of crépi onto the outside of the house. Crépi is a chalk/lime based product that keeps the rain out but allows the walls to 'breathe' and therefore helps to prevent problems with rising damp. The first picture above was taken right at the start of the project and indicates quite clearly the damaged nature of the walls, the second one shows how smart the house now looks.

The actual process was not at all easy or pleasant. I hired a compressor, like those used for the pneumatic drills which dig up the roads, together with a special attachment which would blast the crépi onto the walls. The crépi came in sacks and simply needed water to be added and mixed in a concrete mixer. So we had one person doing the mixing, one person taking the mixture to a wheelbarrow up on scaffolding and a third person actually blasting the mixture onto the walls. I was the person doing the moving and a fairly ghastly task it was climbing up and down ladders with buckets of wet crépi and getting hit by bits of crépi bouncing off the walls.

In all we took three days to complete the task and not only the front but also the side wall and the part of the back wall not made from pebbles were coated. So now the outside is protected against the weather and the house looks a great deal more presentable.

The New Kitchen


In the post for September 2011 there is a description of the start of the work on the new kitchen and the first picture above shows the state of the room just after the start of the work. With considerable difficulty we did manage to put the new oak beam into place and remove all the props holding up the floor above.  In the up-to-date pictures you can see both the new oak beam as well as the one we retained.  The concrete delivery went reasonably well – it was pumped into the room and we had a good team of us spreading it over the floor area, but polishing it to a smooth finish was a bit of a trial given that it was such a large area.

After that the walls were formed using wood stud-work and for the outside walls I put into the voids high density polyurethane sheets to provide substantial insulation. Once the plasterboards were in place I covered the joints with jointing material and then had to sand it all back to a finish suitable for painting – it is a horrid task, particularly on ceilings as inevitably you get completely covered in white dust.

Then I had to put down the floor tiles. These had been bought right at the start of the project to make sure that we had an exact colour match across the whole of the house. What I also tried to ensure was that joints between the tiles would match up with the tiles already laid in the first half of the house. So we drilled a pilot hole through the wall where the corridor across from the hallway to the new kitchen would go exactly in line with an existing tile joint. I then took this down the corridor and judged where I needed to start in the kitchen to make it all work. As it happened when I finally tiled back from the kitchen down the corridor to the hallway the joints were less than 5 millimetres out; effectively unnoticeable.

The next step was to put in all the units and then the work surfaces. And to be sure that we had got the measurements exactly right this meant putting the cooker in place forcing us to abandon the original temporary kitchen and move immediately into the new one. The result of all this work can be seen in the two up-to-date pictures above.

The Utility Room


Space was available off the new kitchen to create a small but very useful utility room. The first picture above shows the space prior to any work commencing, it was set up to be used as an animal pen. And the second picture shows part of it in its finished state – it's difficult to take a picture which shows the space well.

We've taken some of the units from the old kitchen and re-used them for this room but put in a new work surface. There's sufficient space to have the freezer, fridge, dishwasher (what a boon!) and the washing machine all in the room and therefore not making noise and taking up space in the kitchen proper.

The Dining Room


One of the last rooms to be completed as we can easily use the space in the kitchen for sitting down to eat with a reasonable number of people. The first picture shows it just after we had started taking out the original concrete floor which had formed an animal pen. The doorway to the right of the picture leads into what has become the kitchen. Across that back wall we have created a corridor to form the wall for the dining room and it connects to the hallway in the first half of the house. That corridor is still awaiting a coat of plaster as can be seen through the doors in the up-to-date picture. Originally there were two large beams supporting the floor above but they were in a very poor state and had also bent downwards. We decided that the simplest thing to do was to replace them with new oak beams and you can see these in the up-to-date pictures. As with the kitchen beam it was quite an effort to get them up into place. Note the floor tiles are exactly the same as in the rest of the house.

Where the shelves are in the up-to-date picture was originally a doorway into the other half of the house. We retained the recess to give a bit of interest to the room which would otherwise have been a rather plain rectangular box.

The table was quite a find at a local 'Troc' – it means swap, and is a warehouse where people put items for sale and the owners take a commission. The table is solid oak, impossible to take apart and enormously heavy. We had to engage the assistance of a friend who has a large trailer to get it back to the house and then getting it into the room was a mite difficult to say the least, it only just got through the double doors.

Last month we were visited by members of the book group which I still communicate with in UK and we were able to sit eleven of us round the table for very convivial meals.

The Master Bedroom and En Suite Bathroom


This was one of the places where we have had to change significantly from the original plan. The idea had been to put two bedrooms separated by two small en suite bathrooms into the space. The first picture shows how it was at the start with the supporting timbers for the original roof structure in place. Our French builder who renovated the roof to the house did not move these timbers as we had expected and that the posed the problem of how to alter the floor levels as the beams holding the timbers up would have needed to be moved downwards to create sufficient headroom for the two bedrooms/bathrooms.

However, the further problem was that if the beams had been moved downwards we would have needed to dig out the floor in the kitchen to gain headroom there. This would have been enormously difficult, as mentioned in a previous post, as there are virtually no foundations to the walls and we would have needed to underpin them – very difficult and costly. So we made the decision that we would have only one bedroom with an en suite bathroom.

Even that proved very difficult, firstly in 'rescuing' the support structure for the roof. A slow and at times rather dangerous piece of work involving a large number of acrow props till the bedroom was sorted. Then the dormer had to be created to make space for the bathroom. Because the roof pitch is so low it was a real problem to get the dormer roof in place and it was quite a feat of building engineering to achieve it.

The window to the bedroom is in fact the front door that we had put in place at the start of the project; if you look at the picture of the newly crépied front to the house you'll see that we have replaced it with a second-hand traditional French farmhouse door. We have a wrought iron balcony balustrade ready to put on the outside of this window/doorway but that will have to wait till warmer weather now as it will involve the window being open for quite some time as cement dries.

In the picture of the new kitchen you can see that we've put in a wood-burning stove. The chimney for this stove runs up into this bedroom and is hidden behind the doors of the wardrobe. When the fire is lit we open the doors to let the residual heat from the insulated chimney warm the bedroom.

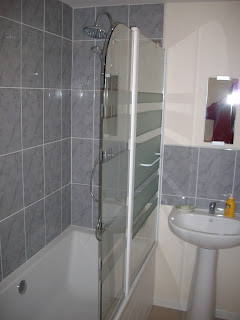
Because we bought rather more floor tiles than we actually needed for the ground floor – there has been far less wastage than we calculated – we have been able to tile out both of the new en suites in the same tiles as the ground floor. It gives a nice sense of symmetry to this part of the house.

The door to the left of the entrance to the bathroom leads into a small space under the eaves, it is immediately above the utility room. It is boarded and plaster boarded out and is to be a dressing room. When I have the time I shall put a small dormer window in to provide natural light and ventilation. On the other side of the bathroom you'll note the space where the hot water tank sits. This awaits a door which is to be made for us by a friend who is a carpenter/cabinet maker, but who is also very busy with other projects. So it may be some time before we get this closed off properly.

Bedroom 2 and En Suite Bathroom


This room is located immediately above the dining room and was an area where the farmers who had used the house had evidently stored hay and/or straw – you can see some of this in the first picture above. Clearing away all this was both dirty and dangerous as the floor was none to sound and I couldn't see where there were fragile bits through which I might fall.


A wall had to be built between this room and the master bedroom and that helped to support some of the roof structure. A stud and plasterboard wall was also put in place to create a corridor running from the original landing past this room to the master bedroom.

There is a door to the right of the entrance to the bathroom which isn't visible in the pictures and this leads into a cupboard space. In here there is also a trap door for access to the roof void.

The Study


With the creation of the new kitchen and utility room the space which had been used previously as a temporary kitchen/diner was freed up. All the kitchen units and equipment were removed and the space is now designated as a study. The computer is located there as well as all the free-standing bookshelves we have, meaning that we can bring together the majority of the books we possess.

My intention is to put all my guitars and amplifiers in the room as well and make use of it as a practice room; my wife has other ideas though! When we have a large number of visitors we can use the room with its futon as extra bedroom accommodation. In due course when time permits and I have the energy I intend to re-point the pebble back wall.

Joining the two halves together


The last major building task having formed all the rooms both upstairs and downstairs was to knock through the wall separating the two halves of the house. This was something of a concern as just to one side of where the opening would be formed is a very large beam supporting the roof above the hallway. The possibility existed that if we took out the wall the beam could slip into the gap and the roof collapse. Thus some very careful building engineering went into the work to ensure that it wouldn't happen during the actual work and that it would remain stable once the holes had been created.

In the early picture you can see both upstairs and downstairs that there are no holes in the walls. And you can also see that these areas had been plastered over. This was fortunate as we were able to take the wall down carefully leaving the plaster intact which meant that the inevitable dust that was produced by the demolition work did not get into the half of the house which we were living in. Of course it liberally coated every surface in the 'new' half and that took a mighty effort to get rid of.

We have plastered back round the exposed areas on the walls where the holes have been created. In the corridors proper as shown by the picture of the one leading to the kitchen we await the arrival of the plasterer who did the work in the hallway so that the finish will be the same thus making the junction between the two halves less obvious.

Half Way there with the Concrete


 (This is a post that was written in September 2011 but never put onto the Blog. I publish it now to give a little continuity to what has been posted above)

Well it happened!

As stated in the previous post about the areas which are to be the patio, terrace and the summer kitchen the work of preparation to create them was completed and only the concrete needed to be dealt with. We had calculated fairly carefully the quantity required and took for the first delivery what we had thought was the maximum amount a lorry could carry in one go – 6 cubic metres. Only a fairly short time is allowed for deliveries so we had to work as fast as possible to spread the material over the prepared area. And the amount delivered was inadequate it only covered four fifths of the terrace.

It was also a red hot day resulting in the concrete drying off very rapidly. So levelling it and then, at the critical moment, polishing it proved very difficult. The latter indeed proved almost impossible for the last parts that we did requiring the concrete to be sprayed.

Thinking ahead we had a discussion with the driver of the lorry about how to deliver the concrete for the kitchen floor as it will be impossible to get a lorry very close to the doorway into it. The answer will be to use a pump system, but of course this will involve an extra cost in the delivery. And the driver also said that actually the maximum load was 7.5 cubic metres.

So for the next stage we ordered up that amount and went through the same process of laying it in the patio and summer kitchen areas as well as finishing off the terrace. This time the weather was a little cooler and also the majority of the work could be done whilst it was shaded from direct sunlight. A much pleasanter experience therefore. The results of all this can be seen in the photos above which you could compare with the ones in the last but one posting.

Now the task is to crack on with the kitchen in terms of fixing sufficient support for the roof so that we can take out all the support from the floor and then do the concreting – which will be the other half alluded to in the title of this post. To that end the new oak beam, which can be seen on the patio, which we bought a week ago will have to be manoeuvred into position at first floor level. Given that the beam weighs approx 1 tonne this is going to be a daunting and therefore slow task!